Below are all the tutorials on getting your new NicoShop Genesis WooCommerce theme set up to appear like our demo. Here is a link as well to our demo that you can view for reference as you’re setting up your new theme!
PLUGIN SETUP
Plugins to Install
Plugins to Install
- Genesis Enews Extended– This is used for the subscribe/newsletter areas.
- Simple Social Icons– This is used for the social media icons on the site.
- Genesis Simple Share – This is used for the social media sharing at the bottom of blog posts and products. It’s an optional plugin, you can use this one or Jetpack.
- Jetpack for WordPress.com– This is used for the social media sharing at the bottom of blog posts and products. It’s also used for related posts at the bottom of blog posts.
- Regenerate Thumbnails– Allows you to regenerate all thumbnails after changing the thumbnail sizes.
- Genesis Responsive Slider – This plugin allows you to create a simple responsive slider that displays the featured image, along with the title from each post. It’s an optional plugin, you can use this one or Soliloquy Lite.
- Responsive WordPress Slider – Soliloquy Lite– This is usede to set up the slider in the homepage.
- Ninja Forms– This is used for the contact form on the demo site.
OPTIONAL PLUGINS:
If you aren’t going to have a shop on your site, you will NOT need to install these plugins.
- WooCommerce– This is used for the eCommerce area of the site. If you aren’t using this feature, don’t install this plugin.
- Genesis Connect for WooCommerce– This is used in conjunction with the WooCommerce plugin to work nicely with Genesis.
If you want to import our demo content, you should install these plugins. Otherwise they’re not necessary.
- Widget Importer & Exporter– This is used to import all the widgets from the demo and helps with setting up the theme for the first time.
- WordPress Importer– This is used to import the demo content and helps with setting up the theme.
How do I set up my shop?
How do I set up my shop?
This theme uses the WooCommerce plugin, which can be obtained here or by searching in Dashboard>Plugins>Add New. You will also need to install the Genesis Connect for WordPress plugin, which can be obtained here or by searching in Dashboard>Plugins>Add New.
Once installed you will get a message at the top of your screen asking if you’d like to install pages. Go ahead and click that button and it will install all the pages you need for an ecommerce site (cart, checkout, account, etc.). This step is very important! Without doing it you will encounter some issues with your page content.
You’ll also want to configure your image settings so that your images aren’t blurry once you begin adding products. Navigate to WooCommerce>Settings>Products>Display and configure as you see below:
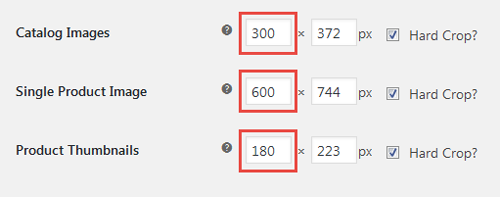
It’s important to keep the highlighted numbers as they are in the image above. You can modify the other ones, according to your images aspect ratio.
You can now begin adding products under Products>Add Products.
PLEASE NOTE: While this theme is pre-styled to work with WooCommerce, we offer no support for the plugin itself beyond the installation instructions above since it wasn’t developed by us. Should you need further support for WooCommerce please visit here.
How do I set up my Social Media Icons?
How do I set up my Social Media Icons in the widget areas?
This theme uses the Simple Social Icons Plugin, which can be obtained here or by searching in Dashboard>Plugins>Add New.
In your Widgets menu, drag the widget labeled “Simple Social Icons” into a widgetized Area.
Configure the widget by choosing a title, icon size and color, and the URLs to your various social profiles. Here is a screenshot of the settings used in our demo:
![]()
How do I set up my Social Media Icons in the Primary Navigation Menu?
Once the plugin is installed, navigate to Appearance>Widgets and drag the widget labeled “Simple Social Icons” into the Nav Social Menu widgetized Area.
Configure the widget as above. The icon size and colors will be set automatically. You can then change colors in the WordPress customizer.
How do I set up my Social Sharing icons?
How do I set up my Social Sharing icons?
In this theme you can use the Jetpack plugin or the Genesis Simple Share plugin.
Using Jetpack
In this theme you can use the Jetpack plugin for your social sharing icons, which can be obtained here or by searching in Dashboard>Plugins>Add New.
Once installed and activated, you will need to sync this with your WordPress.com account. If you don’t have an account there, you’ll just need to create a free account.
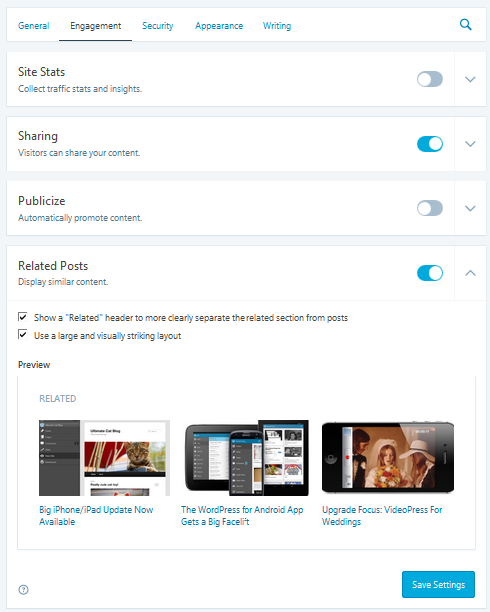
First of all, check if you have sharing activated in Jetpack Setting. Navigate to Jetpack->Settings->Engagement, and activate it. It should match the screenshot below.
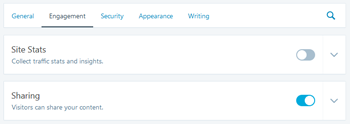
You’ll then navigate to Settings->Sharing and set your configuration to match the screenshot below.
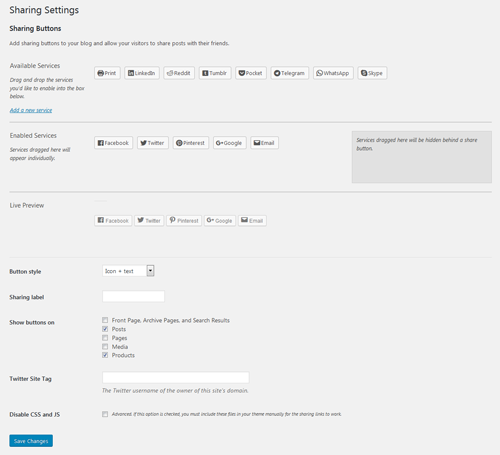
Note: You can also add these to the other areas of your site by simply checking the other boxes.
Using Genesis Simple Share
In this theme you can use the Genesis Simple Share plugin for your social sharing icons, which can be obtained here or by searching in Dashboard>Plugins>Add New.
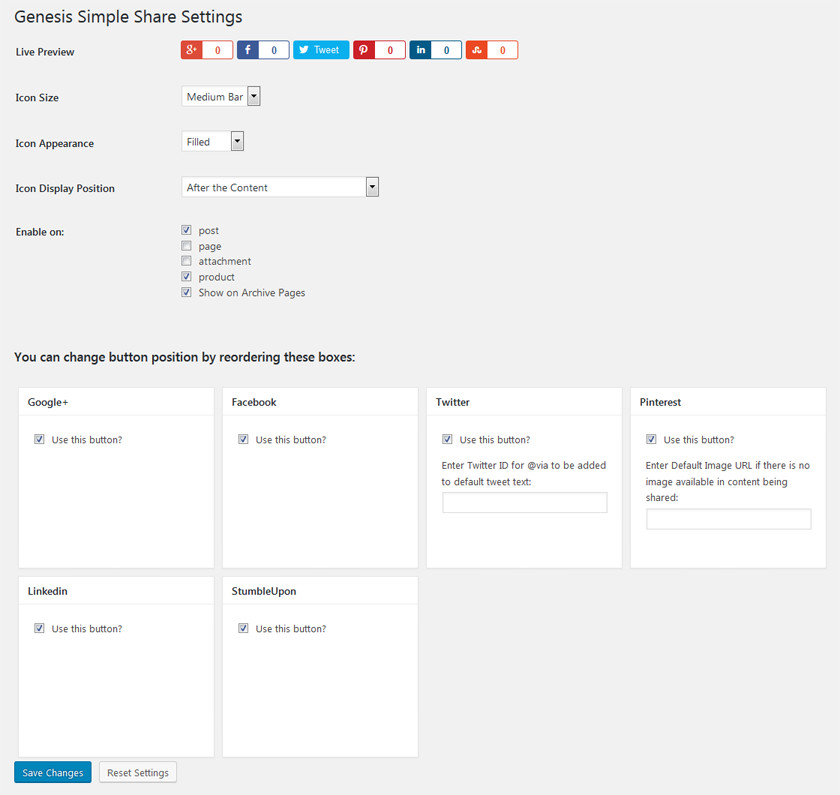
Once installed and activated, you will need to go to Genesis -> Simple Share and configure it as in the screenshot below.
How do I set up my Related Posts?
How do I set up my Related Posts?
This theme uses the Jetpack plugin, which can be obtained here or by searching in Dashboard>Plugins>Add New.
Once installed and activated, you will need to sync this with your WordPress.com account. If you don’t have an account there, you’ll just need to create a free account.
Check if you have Related Posts activated in Jetpack Setting. Navigate to Jetpack->Settings->Engagement, and activate it. It should match the screenshot below.
CUSTOMIZE YOUR SETTINGS
WordPress Settings
WordPress Settings
Once you have your WordPress installed, you should check some settings in order to have our demo working as expected.
First Navigate to Settings > Reading and make sure that you’re configured like this:

You can use a static front page if you’re using a Landing Page or any other page as your homepage.
Second, we need to specify the settings for our media. So, Navigate to Settings -> Media and make sure that you’re configured like this:
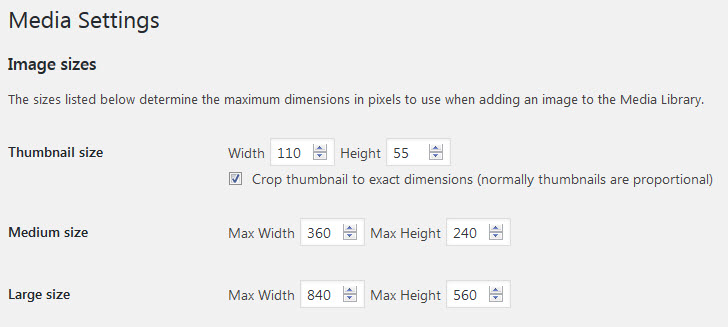
You can change these values in order to achieve your desired results, although we recommend no to change the width value.
As with the slider you should try to match these values with the aspecto ratio of your images.
That’s all, now you’ve your WordPress Settings configured in the right way for our demo.
Genesis Theme Settings
Genesis Theme Settings
These should be the settings configured in the Genesis>Theme Settings area.
Default Layout
This child theme, supports three different default layouts, content-sidebar, sidebar-content and full-page. Our demo is working with content-sidebar which is the usual thing in most websites. For your own content you’re free to work with any of them.

You can also change this settings in a per blog, per page basis. But by default it will be working with the layout specified here.
Header
You can use an image logo or dynamic text. Our demo works with a logo, so check your settings are as in the next screenshot.
If you select Dynamyc Text your Site Title and Tagline, that we’re going to define in the next step will be shown.

Breadcrumbs
You can check freely where do you want breadcrumbs, if you want them at all.

Comments and Trackbacks
You can check freely where do you want to accept comments. Usually comments are accepted in posts and not in pages. But you are free to choose whatever combination you’d like.
Also you can specify this on a per blog, per page basis. But this is going to be the default setting.

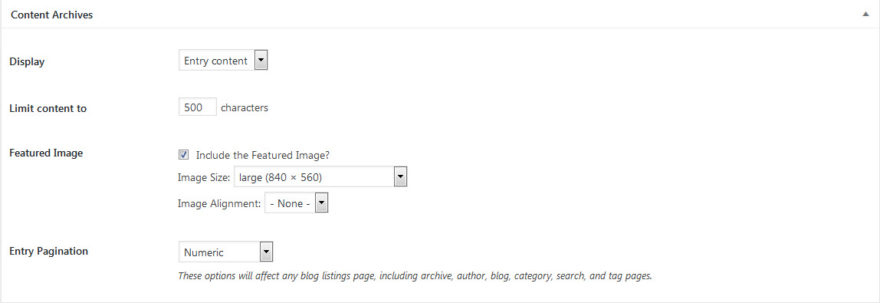
Content Archives
This setting defines how your achives are going to look. For our demo, please check everything is like in the screenshot.
Blog Page Template
Here we setup how our blog page is going to work. We can exclude certain categories, or show the all. Also we specify how many posts will be shown per page.

Header and Footer Scripts
You can place here your Google Analytics code as well as Facebook Pixel etc.
In our demo is left blank.
Once you’ve completed all this settings remember to save them.
Site Title & Tagline
Site Title & Tagline
- Navigate to Settings > General
- Place your blog name in the ‘Site Title’ field
- Place your tagline in the ‘Tagline’ field
Customize your Colors
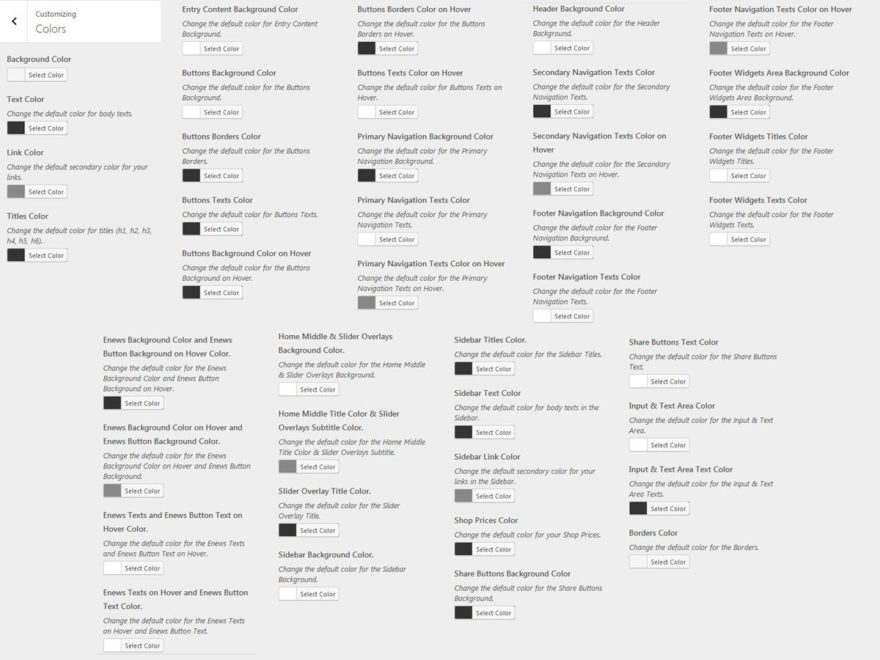
NicoShop Genesis Child theme allows you to change almost all the colors of your website. There are no pre established color schemes, just freely use the colors that you want. In this way you’ll be able to easily have a completely customized website.
Navigate to Appearance > Customize. Then select the Colors panel.
You can change almost all your child theme colors as you can see in the next screenshot.
Custom Header/Logo
Custom Header/Logo
Navigate to Appearance -> Customize -> Upload Logo. Select the “Select Image” button and upload your logo.
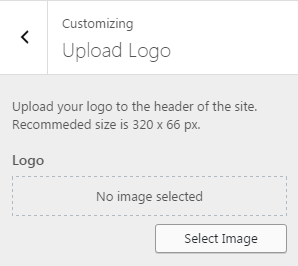
For best results, your logo should be sized at 320pxwide by 66px high before you upload.
Upload a Background Image
Upload a Background Image
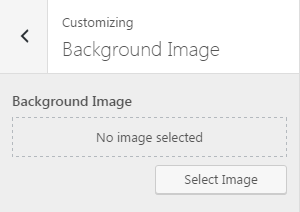
This Child Theme allows a Background Image instead of a color. If you like to place an image instead of a color, just navigate to Appearance -> Customize ->Background Image. Select the “Select Image” button and upload your background image.
Set up your Navigation Menu
Set up your Navigation Menu
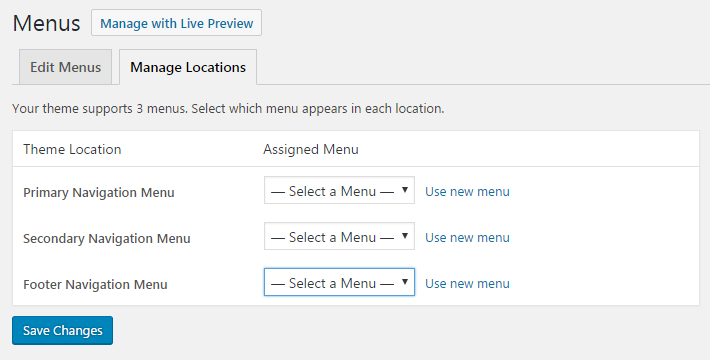
In the NicoShop Theme you have three available menus. The navigation at the top is your Primary Navigation. The Secondary navigation is displayed in the header at the right of the logo. Last, but not least, you’ll find the Footer Menu.
- Go to Dashboard > Appearance > Menus and create your Custom Menu.
- Select the items you wish to add to your menu, and click “Add to Menu”. You can simply drag and drop the items into the order you wish them to appear.
- Then assign your menu to a Theme Location at the bottom of your menu.
FRONT PAGE SETUP
Home Page Layout
Home Page Layout
The home page is comprised of 4 widget areas:
- Home Slider (see above)
- Horizontal Opt-In
- Home Featured Blog Left
- Home Featured Blog Right
The WooCommerce Featured Products Area is automatically filled with the featured products of your shop. If you don’t have a shop, then this area is hidden.
Here is an overview of all the widget areas and what widgets will go in them:

Home Slider with Soliloquy Slider
How do I set up the slider on the home page with Soliloquy Slider?
This theme uses the Responsive WordPress Slider – Soliloquy Lite, which can be obtained here or by searching in Dashboard>Plugins>Add New.
Once the plugin is installed and activated, you’ll need to navigate to Soliloquy in the left side panel of your admin area.
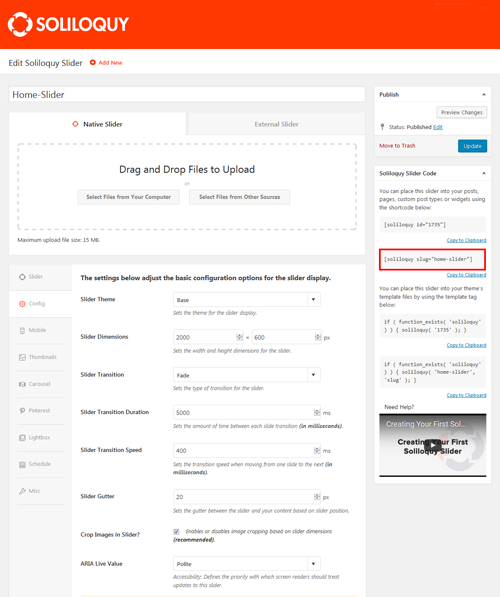
You can add a new slider or use the demo one. Once you’re in the slider that you’re planning to use, you should navigate to config. The setting should match the screenshot below.
Then you can start adding your images to the slider.
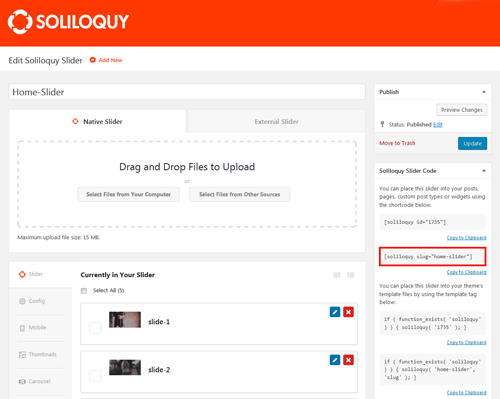
Remember that for an optimal result is important that your images have the same aspect ratio that is defined in the dimensions in the config step.
It’s important, for the next step, that you copy the Soliloquy Slider Code that is highlighted in the screenshot.
We have finished setting up the slider, now we need to insert it in the Home Slider widget area.
Navigate to Appearance -> Widgets and place a text widget in the Home Slider widget area.
Inside this text widget you should paste the Soliloquy Slider Code form the previous step, as shown in the following screenshot.
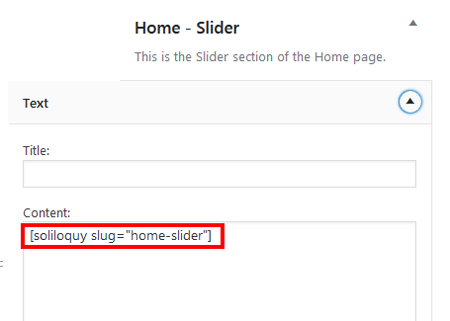
Remember to SAVE the widget and you can finally see your slider in the homepage.
Home Slider with Genesis Responsive Slider
How do I set up the slider on the home page with Genesis Responsive Slider?
This theme uses the Genesis Responsive Slider, which can be obtained here or by searching in Dashboard>Plugins>Add New.
Once the plugin is installed and activated, you’ll need to navigate to Genesis -> Slider Settings in the left side panel of your admin area.
This plugin allows you to create a simple responsive slider that displays the featured image, along with the title and excerpt from each post.
Once you are in Genesis -> Slider Settings some configuration steps are necessary. The setting should match the screenshot below.
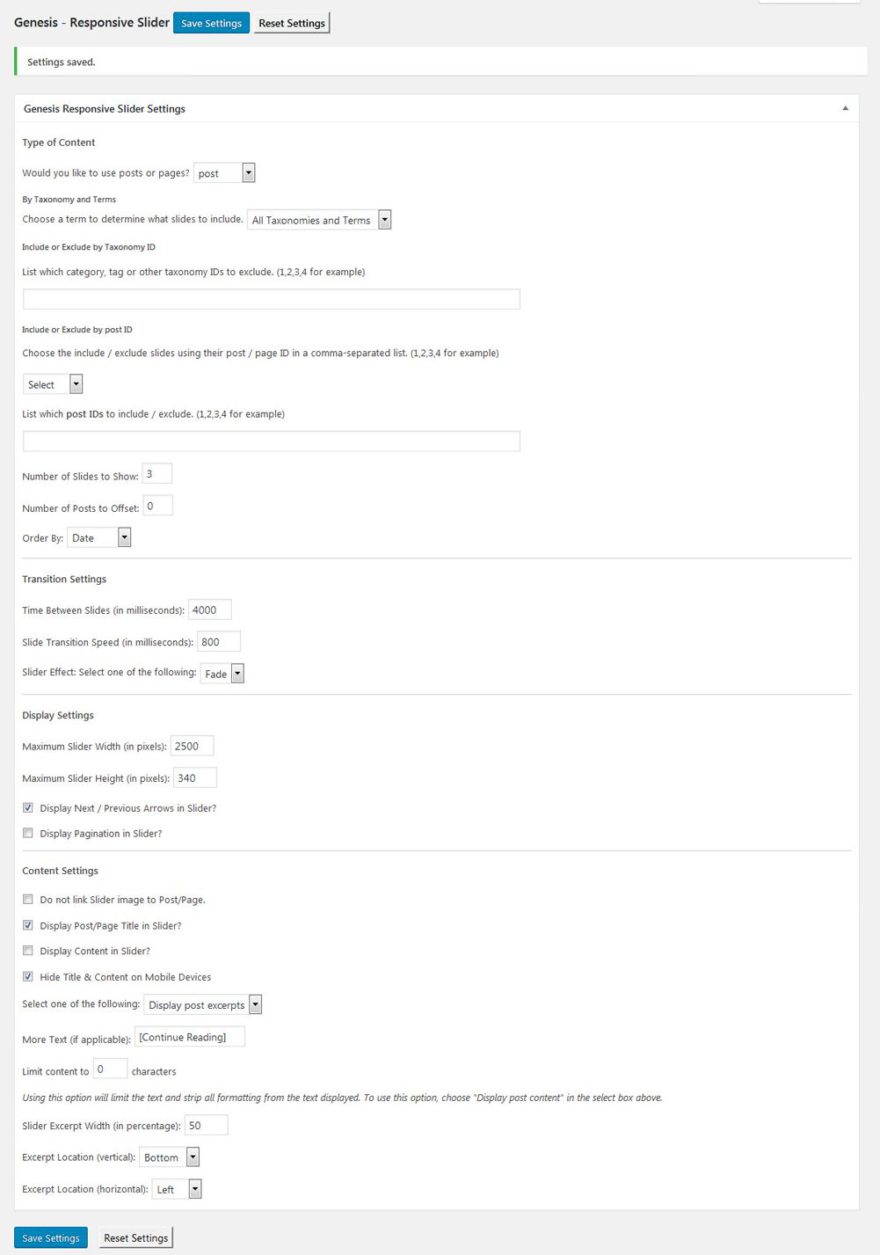
In type of content you can choose to display posts, pages or products, you can also display all taxonomies or just the selected ones. You can even exclude some posts from the slider.
In display settings you can play with these values to accomplish the desired design, but you should leave the width with 2500 to accomplish a full width even in large displays. You can vary the height to the desired one. Remember that for an optimal result is important that your images have the same aspect ratio that is defined in the dimensions in the config step.
In content settings you can choose to display the post title, excerpt, etc.
We have finished setting up the slider, now we need to insert it in the Home Slider widget area. Just navigate to Appearance -> Widgets and drag the Genesis Responsive Slider widget to the Home Slider widget area.
We recommend not to use the Home Slider Overlay widget area if you’ll be displaying the post title and content in Genesis Responsive Slider.
Remember to SAVE the widget and you can finally see your slider in the homepage.
Home Slider Overlay
Home Slider Overlay
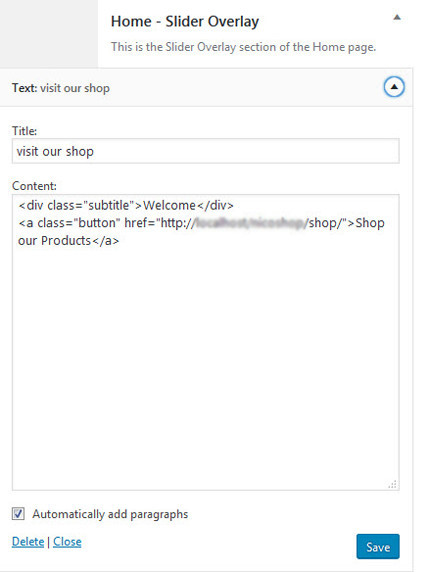
In this widget area you can set up an overlay for your slider. We suggest not to use this widget area if you are using Gensesis Responsive Slider with titles and/or post content.
If you’re planing to use this area, just place a Text Widget as in the following screenshot.
Horizontal Opt In
Horizontal Opt In
In this widget area you can set up an horizontal widget area, for aquiring newsletter subscribers.
Just drag and setup a Genesis Enews Extended widget into this area.
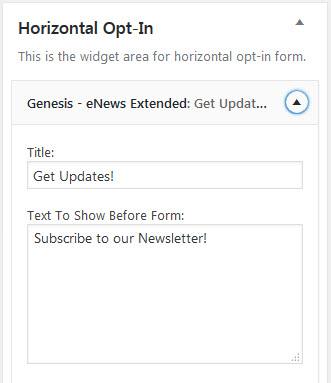
For step by step instructions on setting up the Genesis eNews Extended with your MailChimp account see this post.
Home Middle Flexible Widgets
Home Middle Flexible Widgets
These widgets are all set up as flexible widget spaces. So you can play around to achieve whatever you want, following this layout depending on the amount of widgets that you place here.
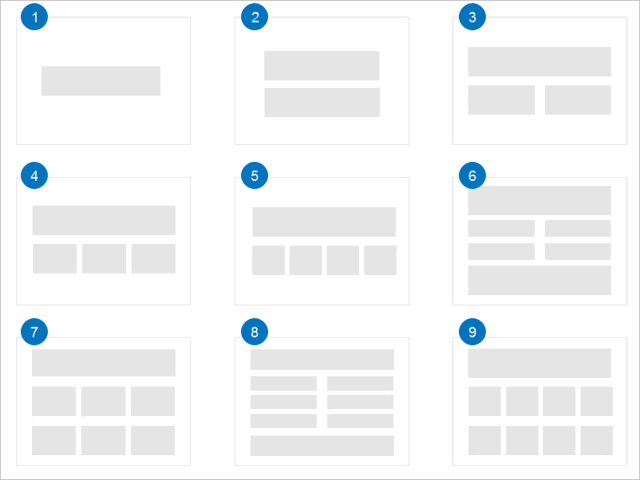
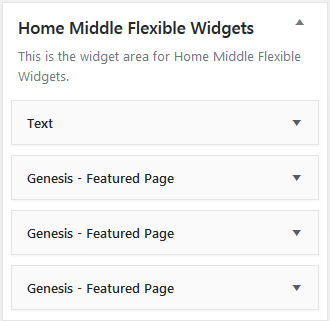
In our demo, as we want three images aligned as in layout 4, we’ve left an empty text widget and then we’ve placed three Genesis Featured Pages widgets as in the screenshot below.
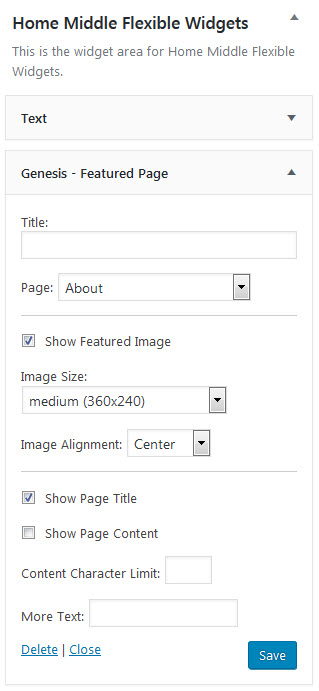
And each of the featured page widgets being,
Home Featured Blog Left
Home Featured Blog Left
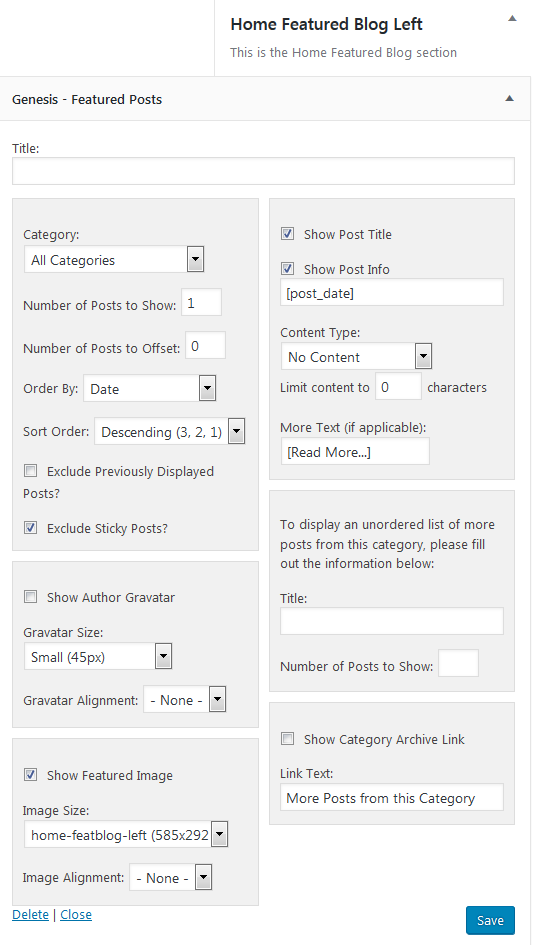
This widget area will display last post’s featured image, title and metadata in a big format ate the left of your page.You should set up the widget area, using Genesis Featured Posts Widget with the settings as in the screenshot below:
Home Featured Blog Right
Home Featured Blog Right
This widget area will display three post’s featured image, title and metadata in a big format ate the bottom right of your page.
You should set up the widget area, using Genesis Featured Posts Widget with the settings as in the screenshot below:
OTHER WIDGET AREAS
Primary Sidebar
Primary Sidebar
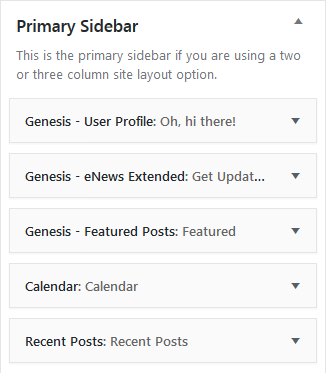
In this sidebar you can place whatever widget you want. This will be shown in every post and page as a sidebar if you’ve specified a content-sidebar or sidebar-content layout.
Footer Widgets Areas
Footer Widgets
The NicoShop theme has three footer widget areas. They’re configured as in the screenshot:

After Entry Widget Area
After Entry Widget Area
The NicoShop theme has an After Entry Widget Area. This wdiget area will be displayed under your posts.
In our demo we’ve an e-news extended widget, but you can place whatever you want.

PAGE TEMPLATES
Blog Page Template
Blog Page Template
- Navigate to Pages -> Add New.
- Give your new page the name of Blog.
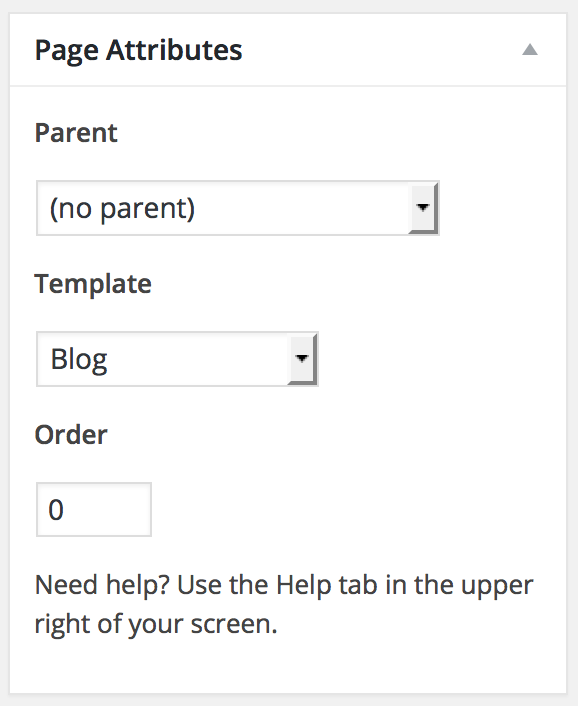
- Then on the right under the Page Attributes panel, you’ll see the Template drop down. You’ll select Blog from that drop down.
- Publish your page. Now all your blog posts are on the blog page!
Landing PageTemplate
Landing Page Template
- Navigate to Pages -> Add New.
- Give your new page the name like Landing.
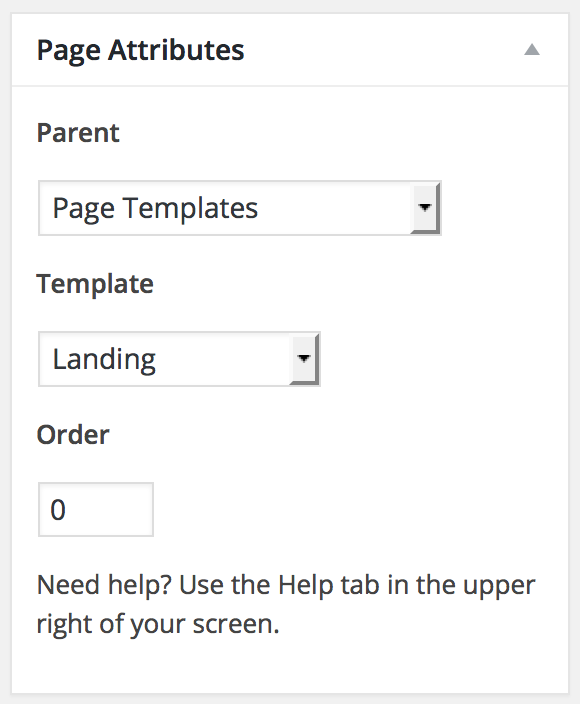
- Then on the right under the Page Attributes panel, you’ll see the Template drop down. You’ll select Landing from that drop down.
- Publish your page. You’ll just add all your content to this page like you do with any other page.
Page Builder
Page Builder
Our suggested Visual composer or Page Builder is Beaver Builder Page Builder.
You can grab your free-version here, or even better the pro version with plenty of templates and improvements here.

